Wednesday 18 September 2013

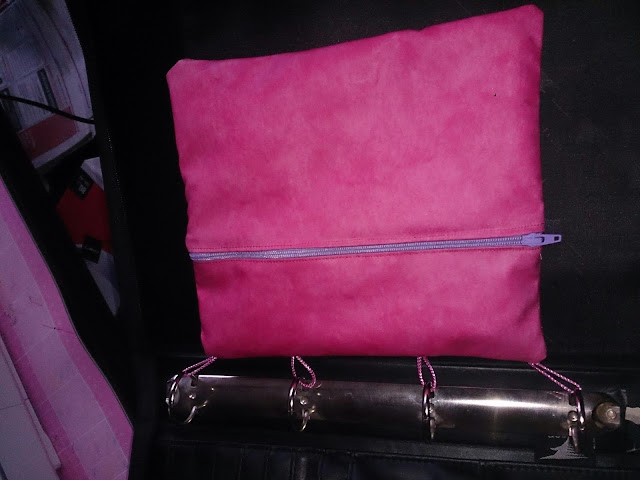
COLLEGE, SO EXCITED!!! - Ring Binder Pencil Case

So that's it I got my GCSE results and the were all passes meaning that I came out with 2 A's, 4 B's and 5 C's! More importantly it means that I get to go to the college of my choice (for any one from America our college is your equivalent of high school, I'm not quite sure) and do the course of my dreams. It also means that as I make more projects I have to do a lot more blogging.....so I am going to start as I mean to go on........ As a way of helping me juggle 6 subjects in my first year (when you are only ment to do 4 - yea I'm crazy I know) I decided not to have a bag but instead use a "conference binder folio", it's easier for me to find one but my only problem was I didn't want to have to spend money on a pencil case that could A. Fall appart at any second, and B. Be ruined as soon as my pen leaked.....this is when the creative side of me started to kick in.  I made a pencil case that had loops so I could attach it to my binder like note pad would fit, I also made it out of oil cloth (I think it's called that, it's the laminated table protectors that come in lots of colours and pictures and stuff). Now your probably thinking the pen it just going to leek through the fabric on the inside because it's not laminated on both sides..... I thought of that and made my pencil case with a lining of the oil cloth so the "plastic" side was also on the inside of the case so it wouldn't ruin the outside. It was super easy to make and the best part is I only needed a 1/4 of a meter of fabric and I had just under half of that piece left to make other things with :-)

If anyone reading this would like institutions on how I made mine please leave a comment and I will post them for you, as well as a few little tips to help you not make some of the same mistakes that I did

Happy crafting xxx
Sunday 8 September 2013

Craft Room Remake

So after God knows how long the folks and I have finally started sorting out my craft room! We emptied it yesterday, have made trips to a 'hardware' store (B&Q for all the English readers, other shops are available and all that jaz....) and have finally got some sort of organisation going on. Dad has built me a fabulous craft table which folds down from the wall and clips to the wall when not in use. It is seriously the best thing ever! All that needs to be done is to paint part if the wall to turn it into a chalkboard and move all of my crazyness back into the room (which is now making the whole house stink of varnish!). I'm soo excited for when I can finally have an actual place to craft and have everything organised and just in time for collage! Picks to follow soon.

By for now, love and crafty hugs :-)

Thursday 18 July 2013

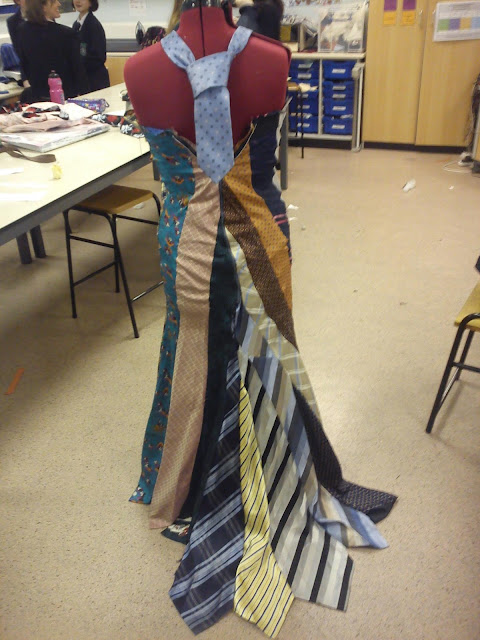
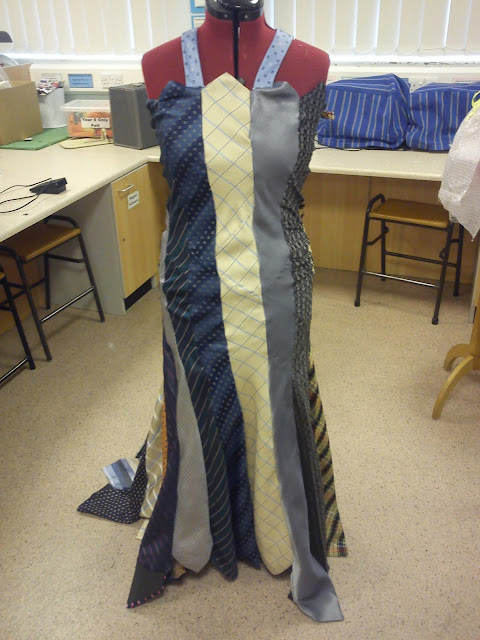
Dress made out if men's ties

Hi, so im back with yet another blog for your guys! I've been blogging a lot recently whilst I've got the chance and hope to be bringing you more blogs very soon.

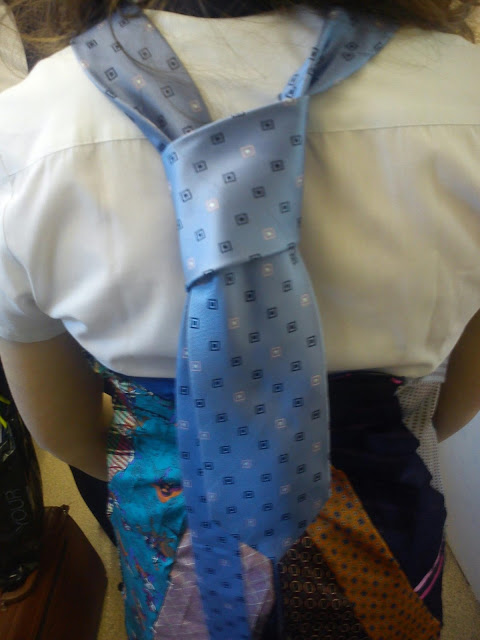
So here is a dress that I made in school for a catwalk show we did at our summer eco fair, our task was to design and make an outfit out if recycled materials so I got the male members of my family to donate any ties that they have but don't wear anymore and I created this halter neck dress.

Unfortunately the pictures arnt as good as I would have hoped because my model didn't want any of her pictures put on the internet (which is totally understandable, she is one of my best friends and if she doesn't want them on there not going on) so I have had to settle for these.

Like I said before the dress has a halter neck and ties at the back like a normal tie, it also has a fish tail at the back which was totally not planned but turned out like that by itself.

Unfortunately the tailors dummy that it is on is way to big (but it was the smallest one we had at the time) so it really doesn't do the dress justice.

I have also made another Asian inspired dress for my final project but I haven't been given thay back yet as it is still at school because we arnt allowed to collect them yet :-( so as soon as I get it back I will write a post and upload some more pictures. Please feel free to comment at the bottom and thanks for taking the time to read my post it is very much appreciated.

Necklace and Earings Made From Shrink Plastic

I absolutly love the way that this turned out and like most of the things I post on my blog it has a story behind it.........

It was 2 week's before I was set to go on study leave with the rest of my Year so that we could prepare for our year 11 GCSE's and I had been thinking about what I could get my form teacher as a sort of "thank you for putting up with my craziness and constant asking if I could go to textiles to do my course work when I should be in form time....". For the life of me I couldn't think of what to get her appart from the usual chocolates, flowers, mug....... Then one day I over heard her talking to another member if my form about how she couldn't wear her favourite top as often as she would like because she didn't have any yellow jewelry. This got me thinking she know I make a lot of my own things why don't I make her some yellow jewelry to remember me by!

When I got home in my hour of craftyness I had restricted myself to a day so I didn't put off revising for my exams I started thinking and looking through my crafty stash for inspiration. That's when I found my yellow sheets of shrink plastic, it was then only a sort hop skip and a jump to finding my flower stamp and black ink pad. I stamped the flower onto the plastic once (only once because I didn't know if the flowers would shrink to small or not enough) after cutting the flower out I used my heat gun to shrink it and it was the perfect size! I then repeated process untill I had enough flowers to make a necklace and earings.

Now came the tricky part how to make the holes for the jump rings.......this wasn't a problem when I remembered the Christmas present my dad had insisted in getting (the present that I secretly love the most coz it's an amazing thing really) my dremal hand held drill! (when I get the time I'll do a post dedicated to it and put some links to my favourite YouTube videos). So I simply drilled the holes attached the necessary findings and there you have it!

My teacher loved the gift and wears it all the time according to my mum who works at my school, who knew that something so simple can make a person's outfit complete!

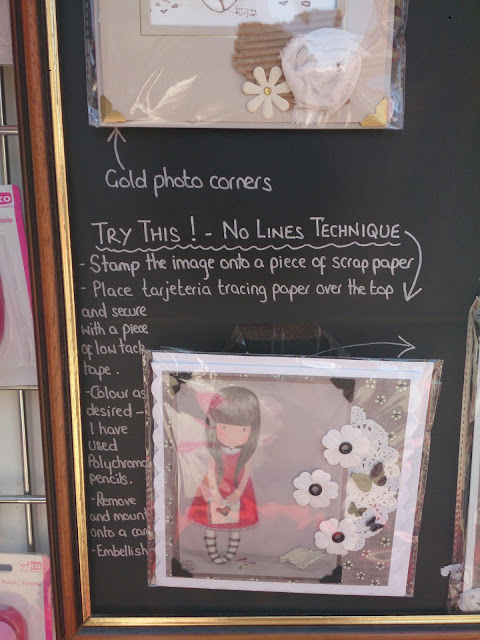
Fantastic Card Technique

Ok so first of all this is not my idea but an idea that I saw in an art shops window in Lancaster (England).

I saw this whilst out shopping one day and with the permission of one of the shop workers took a picture of it so that I could share it with as many crafters as possible!

I have tried this technique myself but with a different stamp and it worked beautifully, unfortunately I did it on the front of a card which I then gave to someone without taking a picture first :-( Never the less this is still a wonderful technique and one that I do on cards for those who mean the most to me.

Get involved!

I'm starting a new section of my blog today and it involves u the wonderful men and women at home! If u have any questions about anything craft related, ideas that you can't find patterns for or want to know if an idea you have would work, simply leave a comment on my blog and even if I personally don't know the answer I will hunt down the answer for you! Remember I created this blog for you the fantastic crafters out there and I want to help you all become the best crafters that you can be because without you all this blog wouldn't exist and the world would be a less creative and in my opinion a boring place to live!

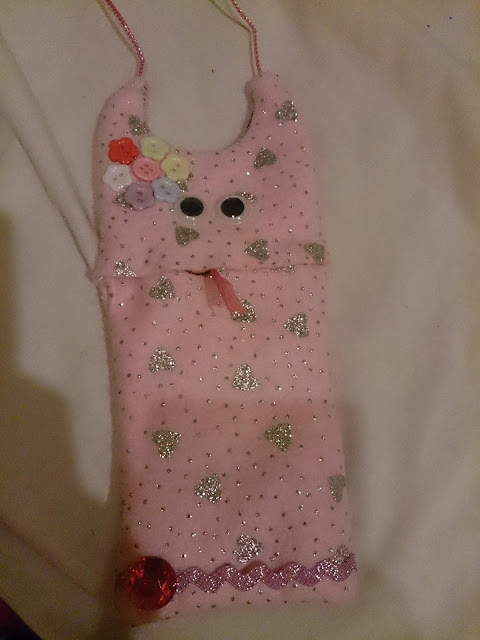
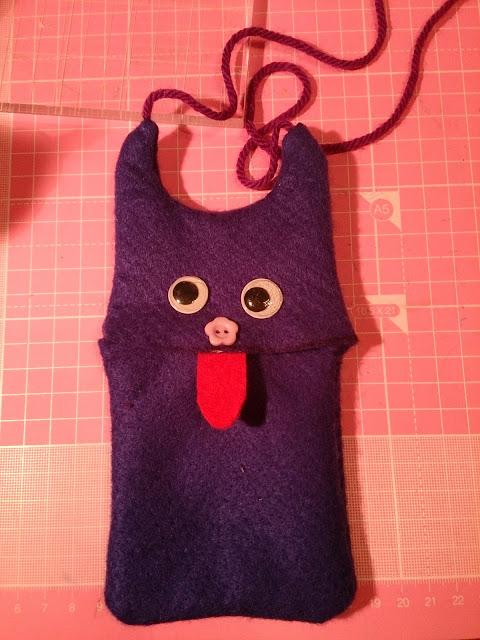
Cute monster purses

So i've been meaning blog about making these for a while now but I just haven't had time sorry x

I made these cute purses or for me they are phone cases because I have a Sony Xperia z and it's huge!

One day I was out shipping and decided that I needed a phone case.....untill I saw the price of some of them :-/ Instead of purchasing one that would probably fall to pieces I decided to make one (well several and I'm going to sell the rest on my craft stall). Not having a pattern I simply made it up as I went along, I drew around my phone and left plenty of seem allowance then cut this Patten out of felt and made the case (it really was that simple).

I've made several different sizes (the pink  one is big enough to fit my Sony in and the blue one just about fits a BlackBerry), my next test is figuring out how to make them for tablets or even laptops!

These cases are so fun to make and why don't u get the kids involved in making there own gadget or coin purses, obviously you would stitch them together to save trips to the emergency room and social services comming round, but let the children chose the colour, buttons and other accessories to stick onto the front. This could be a quick and easy project for a rainy day or even a child's birthday party if u pre made the cases before.

As usual please leave your comments and questions and I'll get back to you, love and crafty hugs x

Monday 3 June 2013

Cute bag for dog grooming things

So I found this super cute paw print fabric that was an absolute bargain from a shop in Manchester. I loved it and it was really cheap but with no idea what to do with I still decided to buy it. The fabric was put into my stash and forgotten about, then a few weeks ago one of my relatives asked me if I would make her a bag that was bright and could put the brushes and things in for her guide dog snoopy. This was a perfect excuse to uses the fabric that I had (the best thing there is loads left to use on another project! :-D), I didn't have a pattern and just made it up as u went along and it turned out pretty good if I do say so myself :-P . My relative loved the bag and it got a paws up from snoopy so all is good ;-)

Tuesday 14 May 2013

Ranger MeltingPot part 2

We'll I have had my meltpot for a few days now and I love it! I'm only practicing at the moment and I keep burning my fingers but I'm getting better and I have some ideas so when I get a chance I will take some pictures and up load them.

Monday 6 May 2013

Ranger Melting Pot

Well I have finally taken the plunge and decided to buy myself a 'melt pot' and I'm really excited it will come in a few days so I will have a play and then upload a few pictures and tell you what I have done and if it's worked so watch this space!

Wednesday 6 March 2013

Mother's Day Gift Ideas

With Mother's Day just around the corner have you got your mother something special?

Well if you haven't its not to late to make her something special and completely unique, why not try your hand at patchwork? Its really simple to do as well as not being too time consuming unlike other sewing projects. Simply chose your fabric, you can buy pre-cut fabric blocks called fat quarters or use your own fabric scraps and cut it down to size. The best thing about using your own fabric is that you can cut the fabric into any shape and size but i suggest that you start off with simple squares and rectangles. But remember if you want your patchwork to be 45cm wide by 45cm long with 9 squares 5cm square then you will have to add your seam allowance onto each piece. So you will cut out 9 squares which are 7cm square, this will then make sure that your final patchwork will be 45cm square.

So still need some more ideas why not try some of these;

  1. A handbag
  2. Pencil case 
  3. Cushion cover
  4. Quilt/Cover
  5. Wall covering
Why not cut out some letters and applique them on to make your gift even more personalized with the name of your mum and theres no need to stop there you can cut out shapes such as flowers and hearts. If you dont feel like cutting them out you can buy pre-cut letters and shapes or but a die cutting machine and dies if your going to do things like this often. 

I hope you find this helpful and if you have any comments or questions please feel free to leave me a comment below and i will get back to you as soon as I can. 

Wednesday 16 January 2013

Knitting Board

So I have recently purchased my self a 'knitting board' now don't get me wrong i'm sure that there wonderful things and the things that you can make using them look fantastic but I am having soooo many problems when trying to use it. I have watched the DVD that came with it and been onto YouTube to try and see where i'm going wrong but that didn't help so if anyone reading this knows what there doing when it comes to knitting board's please help.

My first post!


Welcome to the blog for all thing's crafty!
If its Baking, knitting, sewing or any other wonderful craftiness i'm all over it.
But there's only one problem, i'm not that well experienced in fact i'm self taught and have only been crafting for three years but despite this i'm determined to help people who have the craftiness equivalent of writers block or people who just want to learn something new. I am also writing this blog so that not only am I helping people out there but i'm hoping that readers can help me.